The day the maya brief came, and i'm absolutely positive, stress was ensued the second the first syllable was announced. Well, that's slightly exaggerated, maybe after 'model an interior in maya' was announced you could feel the levels of trauma increase, well they did in me, for i didn't think i'd remember a thing of our maya classes and all the various tools for modelling, drawing curves, rendering, textures, colours, bump mapping, lighting .... i'll admit it seemed like one huge blur when that brief was first given. *Pause to asses the situation* So we must start where everyone must, at the very beginning, grounding the idea; the few sketches that would somehow present themselves in the form of a fully rendered 3-D room (something i knew from day one that i'd have to be proud of, seeing as it would be a miracle if i could succesfully build a wall - let alone a room) It just had to be done one step at a time, even if they were small and tiny steps, they'd finally lead to the light at the end of the tunnel.

Step 1: Concept. Preliminary work, i.e. the sketches of what the room was to be, and the few contents it was to have.
Step 2: The plight of Maya. Okay so there's not much of a predicament once you start, but still it was enough to drive me insane *hopes there's no side effects* Starting off in Maya on a mission, i thought it just best to have a mess around get a good feel for the tools and their advantages and disadvantages, pushing them to the limits (also not amiss of the odd crash of Maya and occasional temper as a result)
Step 3: Construction. Taking time to look at the situation of building a room, or simply deciding where to start, i figure it's best to do it how it's done in real life, minus the foundations. (I don't think it needs to be that in-depth) First down goes the plane for the floor, and then the task of building walls, window sills, skirting boards and architrave.
Step 4: Interior designing? ... what course is this. This step involves, if you get it wrong or model something in the wrong order, some odd tantrums, upset and cursing over 'The Crash!' Which thankfully only happened to me twice and was saved before messing with the lamp base, and sofa settings. Modelling all the objects though, i admit, was pretty simple, once you got your head around the various tools available to you, and ways in which to get the best results from them, and especially enjoyed modelling the glass and the cushions for the sofa.
Step 5: That looks real! As soon as you've finished modelling your object, you now get to choose the colour, pattern and the design in the way you want it to look. I couldn't help but think at this point maya was just a more in depth version of the Sims 2 on the build mode, but slightly more annoying when you forgot how to bring up the texture editor. I did enjoy this, as i could see that slowly my room, was all coming together to finally look like a room.
Oh and there are quite a few side/sub steps called procrastination in there somewhere, but it's just best to leave those be.
 Final Render of the Glass - At some point i will go back and fix the pixelation at the base, now figuring out how it's done
Looking back in hindsight, this assignment wasn't much to cause anxiety over, and once i got stuck in with maya, i thoroughly enjoyed every minute of creating this room. And looking at the final renders, even though there is something not quite right with the shadows, reflected the hard work that i put into making this room. I will certainly consider modelling as a possible career outlook after this project but first i will need to model more. Now onto bigger and bolder creations ...
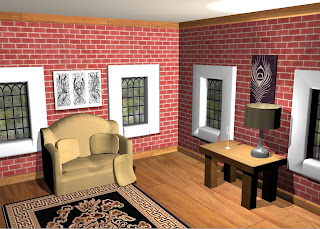 Early Render Shot of the interior
  Wireframe Shot of the interior
 Polygon layout of the interior


